![]() Interarchy
Interarchy
Complex Transfers Simplified - Only With A Mac
![]() Interarchy
Interarchy
Complex Transfers Simplified - Only With A Mac
This window is where you typically start a new action (except for network utility actions which are in the Net sub-menu in the File menu). You can choose the the Protocol (FTP, SFTP, HTTP, WebDAV, iDisk or File) and then an Action (List, Download, or New Net Disk for example). You then need to enter the required details to complete the action (typically, server, path, username and password).
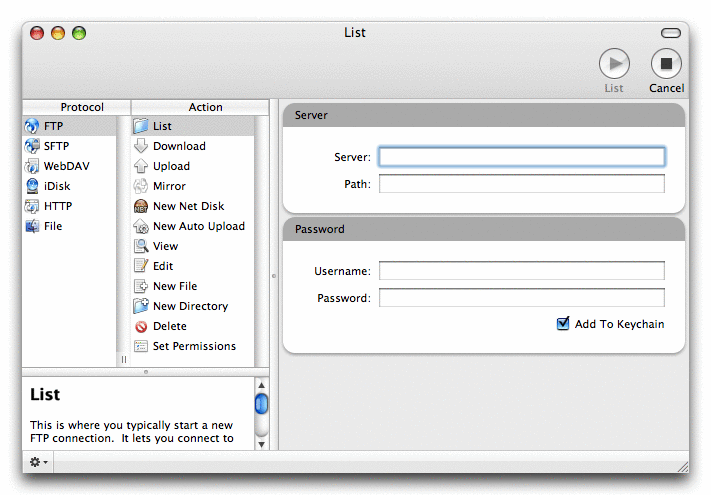
If you have a bookmark or listing item selected, or any other URL is available, the fields are automatically filled in to match that address.
To connect to a server, you would select the protocol, then select the List action. You can also choose actions such as Download or Upload, View or Edit, New File or New Directory, and others. The actions available vary depending on the selected protocol (for example, you can Delete a file with WebDAV, but not with HTTP).
There are six protocols to choose from:
FTP, SFTP, WebDAV and iDisk are ‘first class’ protocols, in that they provide full remote file system-like access. HTTP is much more limited, and local File actions are limited largely because they are not appropriate to Interarchy’s purpose.
Depending on the selected protocol, a number of actions become available:
Enter the server (host) you wish to connect to in the first line.
Generally when you are getting started it is best to leave the path blank, but you can enter it in the second line if desired. Start with a slash to make it an absolute path. Remember that you may be locked into your home directory so that the paths may be somewhat different to what you see if you SSH (Remote Login) into your account. Also, the paths may be different to what you would use when accessing your site using a web browser. And further, using tilde (~) for your home directory or (~user) may not work. All of this is why it is best to leave the path empty to start with so you can see where you are and then start navigating.
Enter your username and password in the next two fields. Leave these blank for anonymous FTP.
If the Add to Keychain checkbox is turned on, your password will be remembered in your Keychain and entered for you next time. If you have a single entry for a given host in the Keychain, as soon as you type the host name in and press tab, the username and password will be filled in for you.
In the action pop-up menu, you can choose whether to take the action immediately, bookmark the action for later, schedule the action to happen at some later time or a repeating interval, or add the action to a Queue window.
Some actions will require additional information. For example, Mirror will require the Mirror Mode, while Set Permissions will require the permissions.
Warning: Mirroring in either direction can destroy a large number of files, so make sure you are mirroring the remote directory you expect, the local folder you expect, and always ensure you have good backups before commencing any mirroring.
See also the Action Menu, FTP, SFTP, Mirroring, Net Disks, Auto Uploads and Check Website sections.
This window is really the heart of Interarchy. This window lets you see a remote (or local) directory listing and operate on those files (download, upload, rename, delete, edit, view, etc).
Just like the Finder, there are three different view styles you can use, Icon View, List View, and Column View, however the top section of the window remains the same for each view, showing the customizable toolbar which gives you fast access to various actions, the bookmarks bar for instant access to your most used bookmarks, and the tab bar to allow tabbed browsing of multiple remote directories at the same time.

The toolbar along the top by default shows:
You can customize the toolbar by choosing Customize Toolbar from the View menu, so you could, for example, add a toolbar button. You can show and hide the toolbar using the View menu or by clicking the Toolbar button in the top-right corner
of the window. You can also change the size of the toolbar by holding the Command key down while clicking the Toolbar button.
Below the toolbar is the bookmark bar showing the bookmarks contained in the Bookmarks Bar collection. You can show and hide the bookmark bar in the View menu. You can add and remove items by dragging items to/from the Bookmarks Bar collection.
Below the bookmark bar is the tab bar, allowing you to browse multiple sites in one window, each in their own tab. You can create a new Tab by choosing New Tab from the File menu, and you can switch between them by clicking on them or choosing Select Next Tab from the Window menu (or Select Previous Tab). You can also copy or move a file from one place to another by dragging the file to a Tab (or wait for a few seconds hovering over the Tab and it will pop to the front and let you drag to a particular location. You can show and hide the tab bar in the View menu.
Also, at the bottom of the window (not shown) is the status bar showing the number of files. You can show and hide the status bar in the View menu. At the far left of the status bar is the action pop-up menu (labeled with a gear and a down arrow). This menu allows you to do context sensitive actions with the selected file.
The first of the three view styles is Icon View. You can change a Listing window (actually a Tab) to Icon View by clicking the left most section of the toolbar button.
Icon View provides the traditional view of files and folders in an iconic format, but now for remote directory listings via using any of the available protocols.
You can move the icons around and (by choosing Show View Options from the View menu to display the View Options window) you can change the icon size, text size, and background color. Naturally Interarchy will remember all this for you next time you visit this directory.
In Icon View you can:
Icon View is nice, and it looks pretty, and it may be appropriate to set up for someone if they are not very familiar with transferring files and want a very simple interface, but it does not really provide much control or information. More commonly, you use Interarchy in List View which you can get by clicking the middle of the toolbar button.
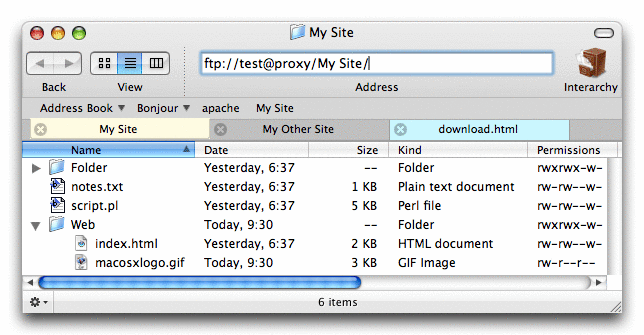
List View shows you a listing of the files and folders in a directory, together with information about their name, modification date, size, file kind and other information. You can (by choosing Show View Options from the View menu to display the View Options window) change the icon size and text size, the color of the tab label, as well as whether to display relative or absolute dates.
In List View, you can:
The third view style is Column View which you can get by clicking the right most section of the toolbar button.
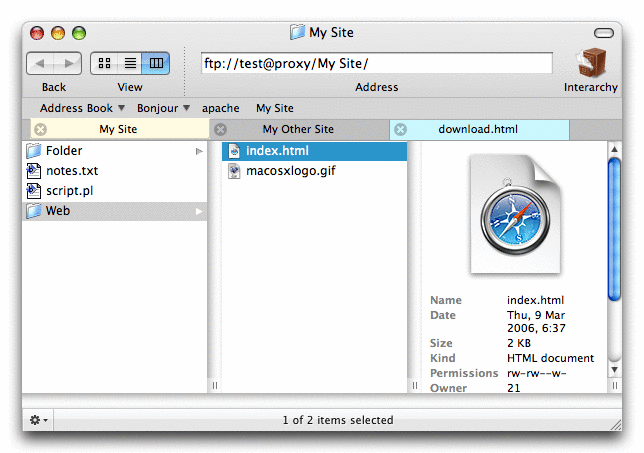
Column View shows the entries in each directory in the path. Clicking on a folder will show the contents of the folder. Clicking on a file will show the information about the file. In Column View you can:
This window lets you see and change the information about one or more files or folders.
You get this window by selecting an item in a Listing window and choosing Get Info from the Listing menu.
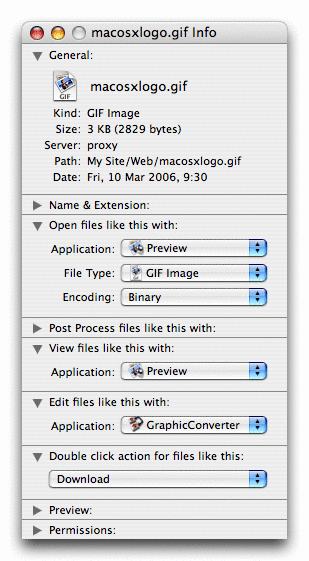
The first pane shows the information about the selected files.
The next pane shows the file name and extension - you can rename the file by changing the name and clicking the button, although this is not the easiest way to rename a file!
The next five panes all refer to “files like this”, which means a file with the same extension. They allow you to specify the File Mapping for an extension, so you can specify:
The Preview pane shows the icon of the file.
The last pane lets you see and set the permissions for this file. Make your changed and then click the button.
This window is the center of Interarchy. It stores your bookmarks which is where you get started with any location you visit regularly, your bookmarks bar for the really frequently accessed bookmarks, it finds locations using Address Book or Bonjour, lists and manages your Net Disks, Auto Uploads, Scheduled Bookmarks and Startup Items.
You get this window by choosing Show All Bookmarks from the Bookmarks menu.
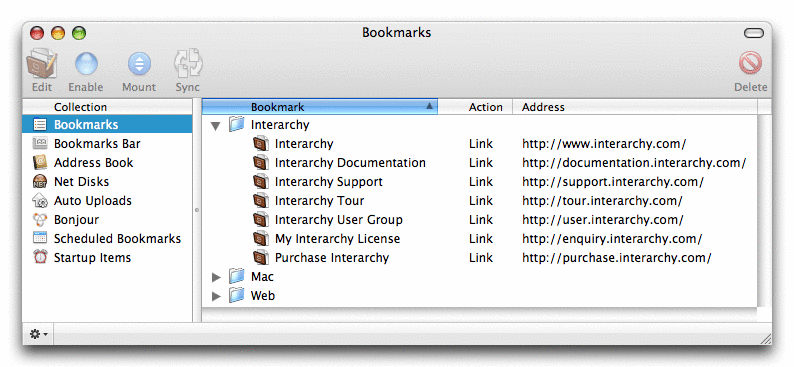
At the top of the window is a toolbar which you can customize by choosing Customize Toolbar from the View menu. By default it has buttons to let you edit bookmarks, enable and disable Startup Items, Scheduled Bookmarks or Auto Uploads, Mount, Unmount or Sync Net Disks, and Delete entries. You can show or hide the toolbar by using the View menu.
The left side of the window lists the various Bookmark collections.
The Bookmarks collection lists your bookmarks. We have provided some to get you started which you can look through and use or delete as you please. You can organize these bookmarks in folders (choose Add Bookmark Folder from the Bookmarks menu to add a new folder), and click-rename and drag the bookmarks around to suit your taste. Double click an entry to execute it. Select an entry and click the toolbar button to edit a bookmark. For the various ways to to create a bookmark, see the How do I create a bookmark? section.
The Bookmarks Bar collection lists bookmarks, similar to those in your Bookmarks collection, but the ones stored here also appear in the bookmarks bar in the Listing window.
The Address Book collection lists the locations in your Address Book.
The Net Disks collection lists any Net Disks you create. You can select a Net Disk and mount or unmount it, force it to sync immediately, or delete it. You can also double click the Net Disk which will mount it (if necessary) and then open it in the Finder for you (see the Net Disks section).
The Auto Uploads collection lists any Auto Upload mappings you create. An Auto Upload maps from a local folder to a remote directory, so that if you drop and file or folder in a local Auto Upload folder onto Interarchy’s application icon, and Interarchy will automatically merge upload it to the correct location in the remote directory.
The Bonjour collection lists the locations advertised on your network using Bonjour (see the Bonjour section). You can click-rename them, or edit, enable, disable, or delete them using the toolbar.
The Scheduled Bookmarks collection lists all your scheduled bookmarks. You can click-rename them, or edit, enable, disable, or delete them using the toolbar.
The Startup Items collection lists all your startup item bookmarks. You can click-rename them, or edit, enable, disable or delete them using the toolbar. Any bookmark can be a startup item, and will be opened by Interarchy when it is launched or when it is activated with no windows open. We have provided a few, but you can add your own by choosing Add Bookmark from the Bookmarks menu and selecting the Startup Items entry from the destination pop-up menu. You can also drag bookmarks from the Bookmarks collection to the Startup Items collection.
See also the How do I work with Bookmarks?, Bookmarks and How do I create a bookmark? sections.
This window lets you see what you have done and repeat previous actions and revisit previous locations.
You get this window by choosing Show History from the History menu.

At the top of the window is a toolbar which you can customize by choosing Customize Toolbar from the View menu. By default it has a button. You can show or hide the toolbar by using the View menu.
At the bottom of the window is the status bar showing the number of entries. You can show and hide the status bar in the View menu. At the far left of the status bar is the action pop-up menu (labeled with a gear and a down arrow). This menu allows you to do context sensitive actions with the selected file.
You can repeat a previous action by double clicking an entry, or delete things from the window by selecting them and clicking the toolbar button, or delete there entire history by choosing Clear History from the History menu.
You can also access the last ten items in the history using the History menu.
The history only stores URLs and actions, not local files or directories, so you cannot repeat an action that requires a local reference (for example, an upload or a mirror). For these purposes, use a Bookmark instead.
This window lets you save a sequence of files to download or actions to perform into a queue and then execute them in series at a later time.
You get this window by choosing New Queue from the File menu, or by using the Add to New Queue in the action pop-up menu in the Connect to Server window.

At the top of the window is a toolbar which you can customize by choosing Customize Toolbar from the View menu. By default it has buttons to let you start or stop the queue, edit entries, schedule the queue to run at a later time or repeating interval, or delete entries. You can show or hide the toolbar by using the View menu.
At the bottom of the window is the status bar showing the number of entries. You can show and hide the status bar in the View menu. At the far left of the status bar is the action pop-up menu (labeled with a gear and a down arrow). This menu allows you to do context sensitive actions with the selected file.
You can add entries to a queue using the action pop-up menu in the Connect to Server window, or by dragging entries from the Bookmarks window, the History window or a Listing window.
This window lets you see the details of what is happening.
You get this window by choosing Transcript from the Window menu.
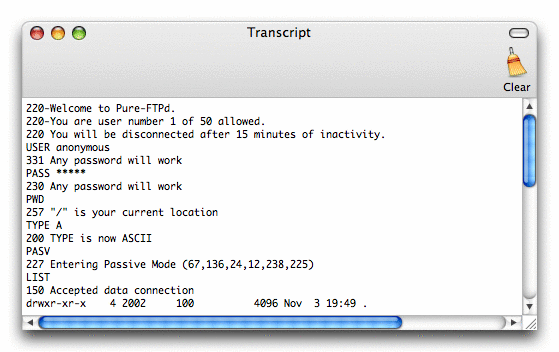
This window shows the low level dialog between Interarchy and the servers it talks to. You can use it to debug problems or see exactly what is happening. If you have a problem with a particular server or transfer, and you ask us for help, we will almost certainly ask you to send us a copy of the transcript from this window, which you can do using the Save As command in the File menu
This window lets you see what transfers are currently in progress or have failed.
You get this window by choosing Transfers from the Window menu.
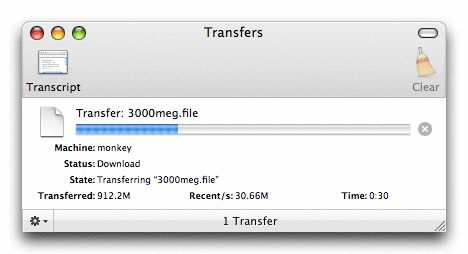
The window contains a list of current transfers, each in its own panel.
At the top of the window is a toolbar which you can customize by choosing Customize Toolbar from the View menu. By default it has buttons to show you the Transcript window and to let you clear out all the error panels. You can show or hide the toolbar by using the View menu.
Each panel contains information about one transfer, or if an error occurs, one error. At the top right, there is a small close box to cancel the transfer. After the transfer is canceled, or in the event of any other error, the close box becomes a retry button.
The panel also shows the progress bar, the server that the transfer is going to/coming from, and the name of the file.
Below that are some statistics. You can get different statistics by clicking on these entries.
The left one shows the size transferred, total size, or remaining size.
The middle one shows the speed of the connection, recent or overall, in seconds, minutes or hours.
The third one shows the time of the transfer: start or finish time, time so far, remaining or total time.
And yes, that window is for real, Interarchy was transferring a 3000 Meg file over gigabit ethernet at 30 MegaBytes per second, transferring almost 2 GigaBytes per minute!
This window shows you the results of checking a site for broken links.
You get this window by choosing Connect to Server from the File menu, selecting the HTTP protocol or the File protocol, and the Check Website action, then entering the location of the website to check.
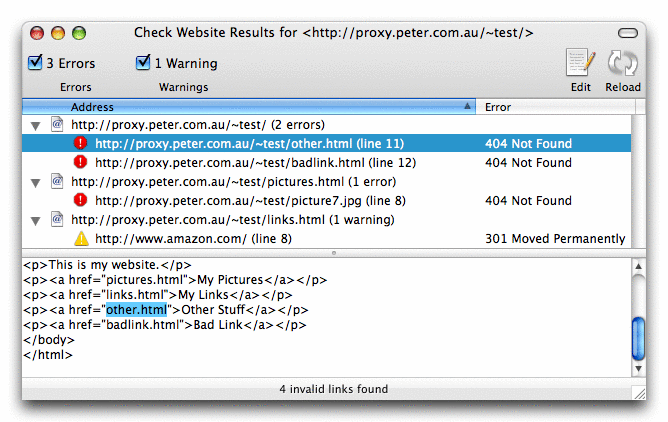
This window shows the errors and warnings detected.
At the top of the window is a toolbar which you can customize by choosing Customize Toolbar from the View menu. By default it has buttons to let you rerun the check or edit a misbehaving file, as well as enable or disable errors or warnings. You can show or hide the toolbar by using the View menu.
Each web page with an error is displayed in a list, and in turn lists the errors it contains. The example above shows the index.html web page referring to an other.html web page which does not exist.
If you click the toolbar button (or just double click an error), Interarchy will let you edit this offending file to correct the problem. But since you cannot edit a file via HTTP, first you will need to set up a map from your website URLs to your FTP (or SFTP or WebDAV) URLs. An alarming window will appear with detailed instructions. Take a deep breath and follow the instructions. You will need to know the base address for your website as both an http: URL and an ftp: (or sftp: or webdav:) URL. Enter the two URLs, both ending with a slash (/) as well as the name of the default web page (usually index.html). You will only be asked once, after that Interarchy will remember for you and you will be able to edit web pages without even noticing. You can change the mapping by holding down the option key while double clicking the error.
This window shows you the results of a mirror (manual or Net Disk).
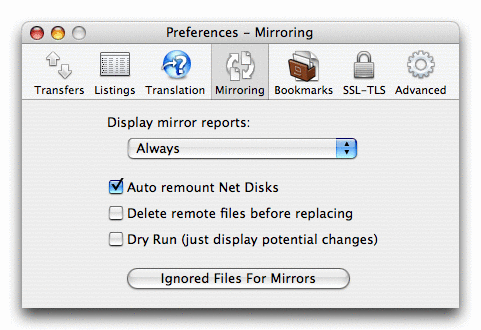
You get this window whenever a mirror runs (unless you disable it using the “Display mirror reports” preference in the Mirroring panel of the Preferences window).
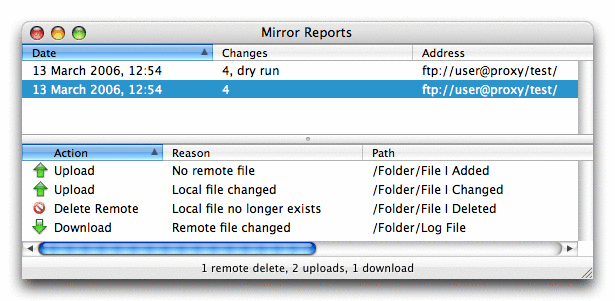
The window shows a summary of the actions that have taken place in the status bar (which you can show and hide using the View menu).
Each line contains the action for one file that is different in the local and remote directories. It tells you what happened and why (or for dry runs, what would have happened).
This window lets you examine a machine on the Internet.
You get this window by choosing Network Host Info from the Net sub-menu in the File menu.
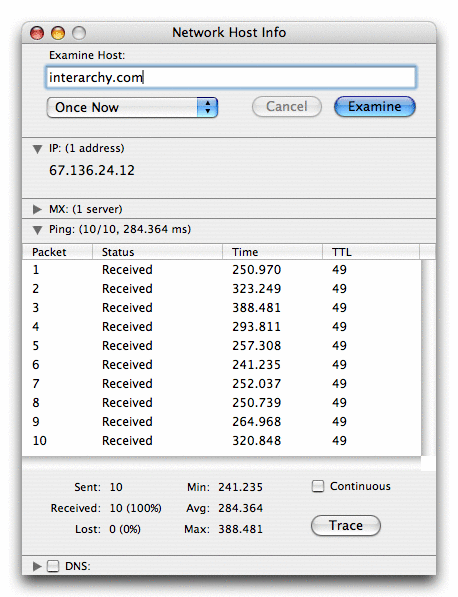
If you have not yet completed the installation, you will be asked for Administrative Permissions to complete the installation. You can use this facility without completing the installation, but you will not be able to ping the remote host.
When you examine a host, Interarchy will tell you the IP address(es) of the host (or if you provide an IP number, the name for the IP number), and the MX address(es) for the host name (where email will be sent). It will also ping the host to see if it is currently alive and contactable. And if enabled, Interarchy will look up the DNS registrar information for the host name, that is, who owns the name, when it will expire, etc.
You can have the Ping continue on indefinitely by clicking the Continuous checkbox which will let you see when the host is reachable or becomes unreachable.
You can click the button to open the Trace Route window to see where a problem might be occurring.
This window lets you examine the route packets take from your Mac to a machine on the Internet. You can use this to determine where a problem lies.
You get this window by choosing Trace Route from the Net sub-menu in the File menu.
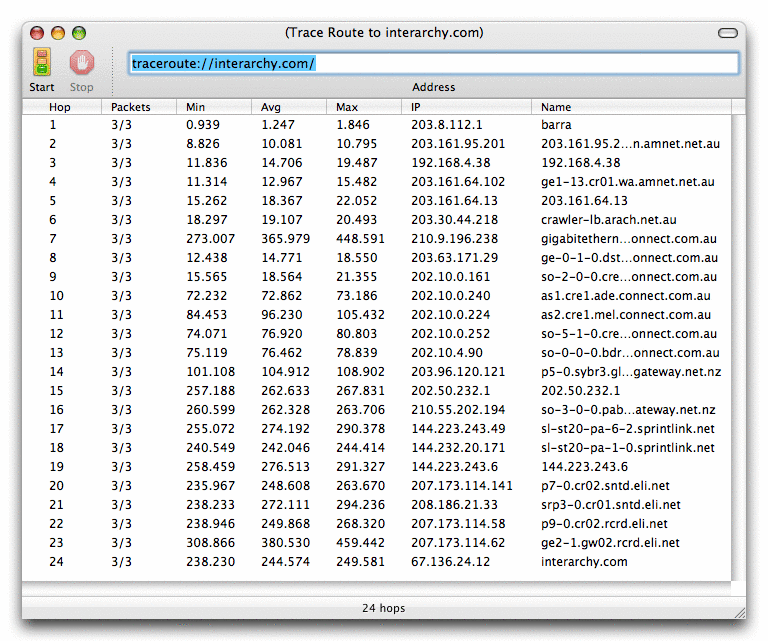
If you have not yet completed the installation, you will be asked for Administrative Permissions to complete the installation. You must complete the installation before you can use Trace Route.
At the top of the window is a toolbar which you can customize by choosing Customize Toolbar from the View menu. By default it has buttons to let you start or stop a trace, as well as a field to enter the address to trace to. You can show or hide the toolbar by using the View menu.
Enter the host name or IP address of the machine you want to trace the route to, and then press return or click the toolbar button.
Interarchy will proceed to enumerate the hosts and routers between you and the remote host. For each intervening host, Interarchy will send three packets and report the time taken, as well as the minimum, maximum and average packet time, the IP address and the DNS name.
A good rule of thumb is that if the Trace Route gets nowhere, the problem is on your network, if it gets only a few hops, it is probably your ISP or local network, if it gets almost all the way, it is probably a problem with the remote server or their network, and if it is somewhere in the middle, it is probably a major problem at some trunk line or major Internet hub.
See also the How Trace Route Works section.
This window lets you examine a particular machine on the network to see what ports are open. You can use this to determine if your Mac or another machine provides a particular service or may be vulnerable to a hacker. You should never use this against a machine you do not control, otherwise you yourself may be considered a hacker.
You get this window by choosing Port Scan from the Net sub-menu in the File menu.
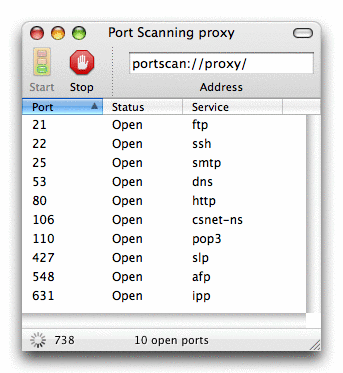
Interarchy can do a port scan instantly against your own Mac, but it deliberately proceeds very slowly against any remote Mac (it may as well anyway, since most machines these days will apply the brakes if you try to connect too quickly to them).
The scan shows you the port number and service name of any ports that are open. The Status field is either Local (which means that only local programs can connect to the port), Open (which means potentially anyone can connect) or Restricted (which means only certain hosts are allowed to connect). Obviously, Interarchy can only detect Open ports on remote machines (since it could not connect to any Local ports!).
Firewalls may block connections on certain ports, and Interarchy can be used to double-check the accuracy of firewall rules, although obviously we take no responsibility for any false comfort this might erroneously give you!
This window lets you examine a particular network interface on your Mac, and is one of the prettiest windows in the program.
You get this window by choosing Status from the Net sub-menu in the File menu.
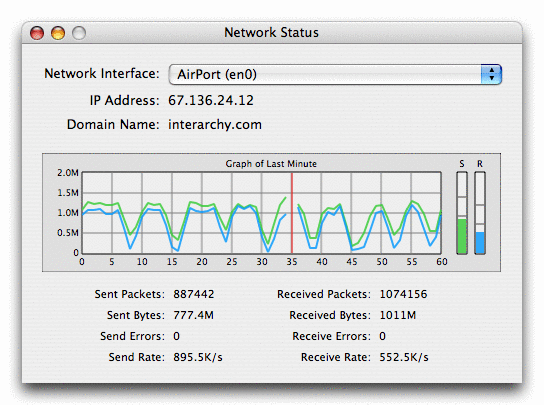
Choose the desired network interface from the interface pop-up menu. Interarchy will show you the IP address and DNS name of the interface, and will begin graphing the bandwidth usage on the interface. Interarchy remembers which interfaces you have looked at recently, and will continue to monitor them for some time afterwards, so you can safely close and reopen the window, although Interarchy can only monitor the interface while Interarchy is running.
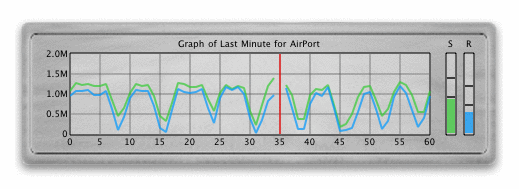
The graph can show the data for the last minute, 12 minutes, hour, 4 hours or day (click on the graph to toggle between them). The scale on the left shows the amount of data (in bytes per second). The green line shows the data sent from your Mac, and the blue line the data received. The vertical red bar is the current time. On the right the bar graph shows the current value, as well as average and maximum rates.
At the bottom, the information is presented in a more mundane text format.
The picture shown was uploading and downloading a file over a wireless AirPort extreme connection, and shows the 2.5 Megabytes/second (25 Megabits) of bandwidth available was roughly split between the two transfers. it is interesting to note that the transfer rates for both incoming and outgoing data tended to cycle in concert, perhaps indicating a flaw in the protocol or a cyclic interference (although not such issues were noted when only a single direction transfer was in progress).
There is also a Dashboard Widget to display the network status graph.
See also the Network Status Window and Dashboard Widgets sections.
This window lets you examine the network connections on your Mac.
You get this window by choosing Connections from the Net sub-menu in the File menu.
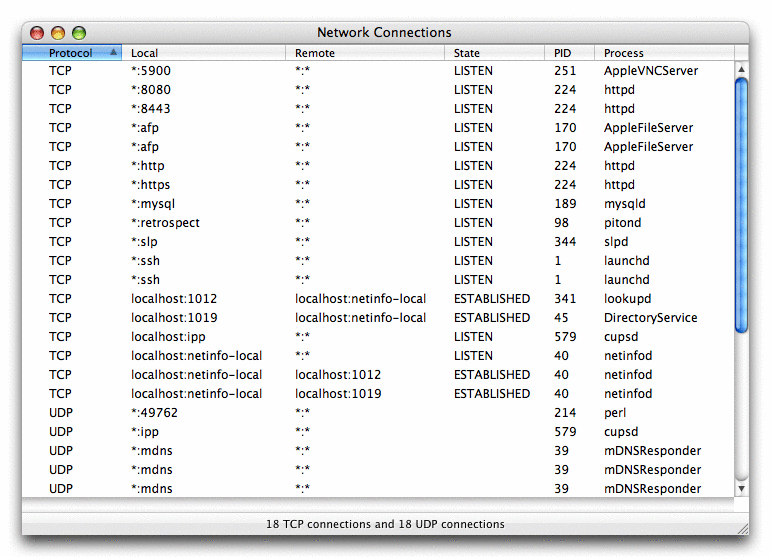
This window shows a line for each current connection on your Mac. The first column shows the protocol, the second two show the source and destination ports, then the state of the connection, the process ID of the connection and finally the process name.
If you have not yet completed the installation, you will be asked for Administrative Permissions to complete the installation. You can use this facility without completing the installation, but you will not be able to see the process name, except for processes that are run under your username. “(limited)” will be added to the window title to remind you to complete the installation if possible.
The address fields are in host:port format. “*” means any host (or port) will be acceptable.
The State column shows the current connection state of the connection. Typical states are LISTEN (which means your Mac is waiting for another machine to connect to it) or ESTABLISHED (which means your Mac is currently connected to another machine). After a connection finishes, your Mac remembers it for a couple of minutes in CLOSE_WAIT state so as not to become confused if it receives an unexpectedly late packet (for example, one that got stuck in a congested router for some period of time).
Under Mac OS X 10.2.x, CFM applications will show their process name as LaunchCFMApp, although this is resolved in 10.3.
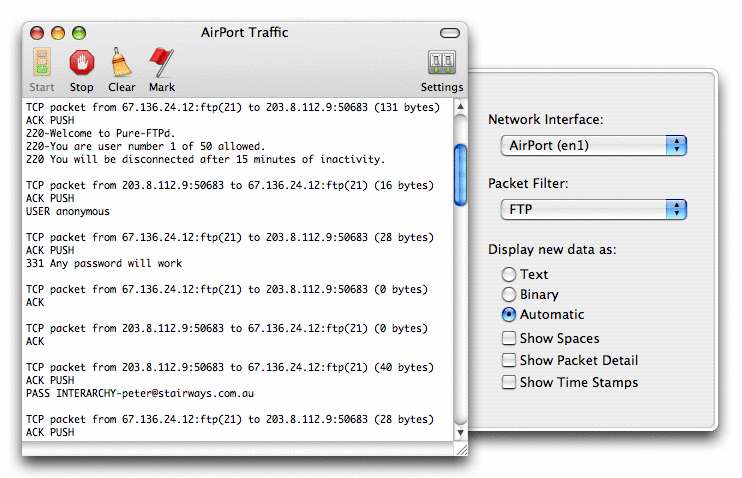
This window lets you watch network traffic on a network interface. Traffic includes any traffic on that interface, not just traffic to or from for your Mac. The window shows the details of each packet that comes to your Mac from the specified interface, or goes from your Mac out the specified interface.
You get this window by choosing Traffic from the Net sub-menu in the File menu.
If you have not yet completed the installation, you will be asked for Administrative Permissions to complete the installation. You must complete the installation before you can watch traffic.
At the top of the window is a toolbar which you can customize by choosing Customize Toolbar from the View menu. By default it has buttons to start or stop traffic watching, clear the display, or show or hide the Settings drawer. You can show or hide the toolbar by using the View menu.
If Network Traffic watching fails to start, the usual problem is that you have selected an interface that is not currently active, so try a different interface.
The Settings Drawer on the right allows you to choose the interface, choose or create a packet filter, and specify how the packets are displayed.
First, select an interface from the interface pop-up menu.
Next select a packet filter to restrict what traffic you will see. We have provided several filters for you, or you can make your own using any PCAP filter (see the PCAP Packet Filter Logic section), for example:
tcp port 135 or tcp port 139 or udp port 135
By default, Interarchy will automatically determine whether a packet is text or binary and display it appropriately, but you can force it one way or the other using the radio buttons.
You can also select to see spaces, gratuitous packet detail such as IP header fields, and time stamps for each packet as they arrive.
Watching traffic can be very useful in determining where a problem lies or in learning the details about a network protocol (such as how CGI forms are processed). Since it will show any clear text password (such as those used by FTP or Telnet), it can also help encourage you to use a more secure protocol, such as SFTP or FTP/SSH.
Network Administrators who wish to require Administrative Permissions before someone can use Interarchy to watch traffic may do so by using the Mac OS X Authorization Services system to specify the required authorization for com.stairways.interarchy.watchtraffic. See Technical Note TN2095.
See also the PCAP Packet Filter Logic section.
This window shows you the version of this copy of Interarchy, to whom it is registered, and allows you to enter your registration details or visit the website.
You get this window by choosing About Interarchy from the Interarchy menu.

To enter your registration details, click the button. A window will appear in which you must enter your registration details exactly as they were sent to you from us or Kagi.
Even if you have changed your email address with us, the serial number and username email address do not change.
If you have forgotten your serial number, you can have it emailed to us by clicking the button, or visiting the http://enquiry.interarchy.com/ page directly.
This window lets you configure Interarchy.
You get this window by choosing Preferences from the Interarchy menu.
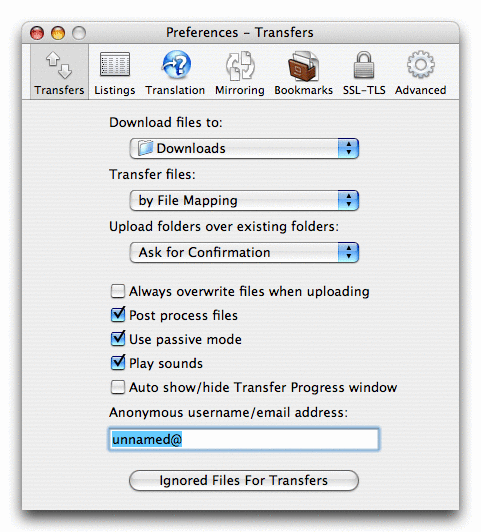
Across the top there are seven icons representing seven different panes, each one showing different preferences.
The first pane is for configuring how Interarchy transfers files and folders.
The second pane lets you control the display of a Listing window.
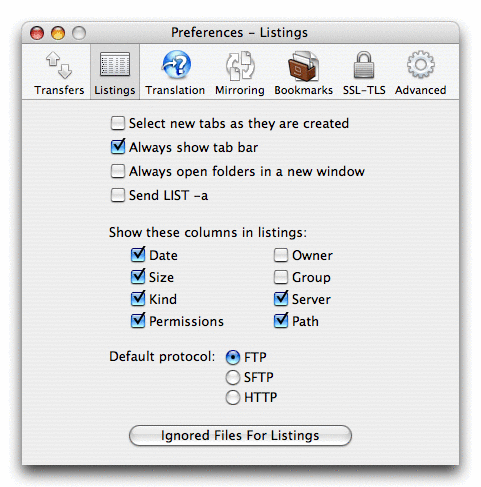
You can control whether new tabs are selected when created, whether the tabs are always shown, or only shown when more than one tab exists in the window, as well as what columns are displayed in the listing.
Normally when you double click a folder, its contents will replace the contents of the current window. If you enable the “Always open folders in new windows” preference, folders will be opened in new windows.
For some FTP servers, sending the LIST -a command will cause them to show all files, including those start with a dot (.). Since this is not a standard part of the FTP protocol, other servers may simply fail entirely if this option is enabled.
You can also control what the default protocol is for the address field in the listing window, and the default protocol to use when only a host name is specified.
The button displays a sheet allowing you to control what files are ignored in listings. The pattern is a PCRE Regular Expression (see the PCRE Regular Expression Syntax section). The default pattern allows you to disable each pattern (ie, stop ignoring that kind of file) by placing a # at the start of the line, or enable a pattern by removing the # from the start of the line. By default, all files are shown, but remember that if the FTP server does not show the files to Interarchy (visible in the Transcript), this setting will not enable you to see them (the “Send LIST -a” preference in the Transfers panel of the Preferences window may help).
The next pane lets you control how files are translated when they are transferred.
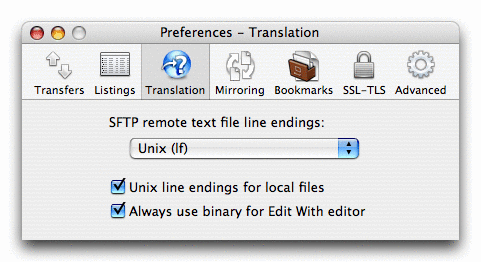
The next pane lets you control mirroring options.
The next pane lets you control what dynamic bookmarks are shown in the Bookmarks Bar.
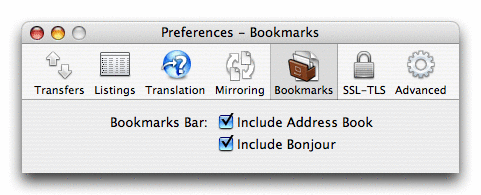
You can select whether bookmarks are opened into a new window, or are opened in to a new tab in the front Listing window.
The next pane lets you control FTP/SSL-TLS.
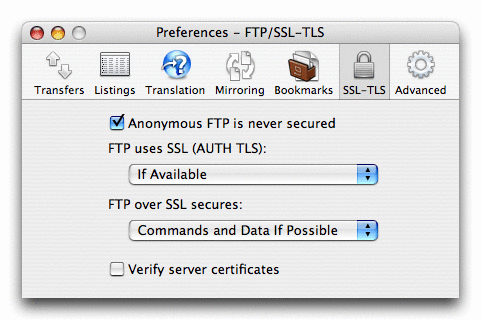
By default, Anonymous FTP is not secured over SSL-TLS, but for everything else, Interarchy will try to secure the control connection and data connections.
Since many certificates are self-signed, and hence will not verify, but still provide good protection against snooping passwords, Interarchy does not verify certificates by default.
If you have problems with an FTP server, especially if the problems are at login, or attempting the first listing, the two things to try are toggling passive mode and disabling FTP over SSL-TLS (which gives you four possible combinations).
The last pane lets you configure some system defaults.
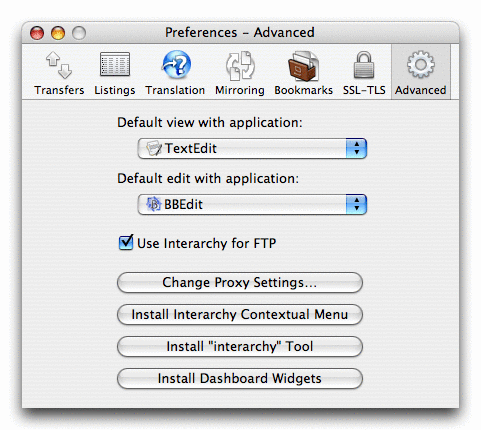
Most of these preferences can be set from the command line or AppleScript, and many of them can be configured on a per-host basis using those methods (see the Preferences section).
This window lets you control the view options for a Listing window.
You get this window by choosing Show View Options from the View menu.
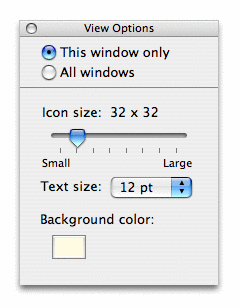
The window lets you set the view options for this directory, or for all directories.
The information is slightly different in icon and list view, no options are available in column view. It lets you set the icon size, text size, whether to use relative dates, and what background or tab color to use.